Wednesday, January 9, 2013

Morgana Cryptoria Fire Brick Swatch & Review! Best Metallic Red Lipstick!

Hello again. Today, I'm going to show you my new favorite red lipstick. It's called Fire Brick and it's by a brand called Morgana Cryptoria. I didn't hear of this brand until I browsed through Blix's blog and saw some posts showing off this amazing red lipstick. When I saw it, I fell in love!

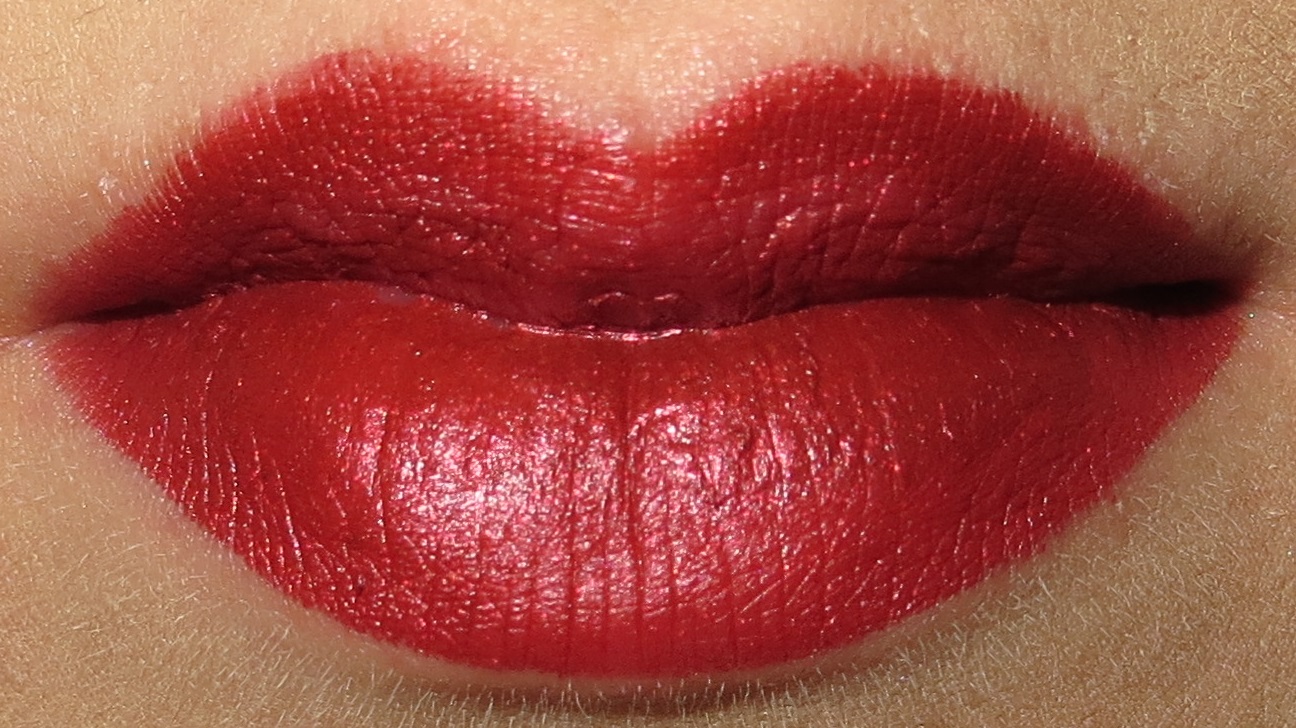
Let me start off by saying that I am in love with this color. It's a very vampy deep red with a frosted metallic sheen to it. It is highly pigmented and rich in color. It is opaque and applies very nicely due to the shape of the lipstick, which I will show  towards the end of this post. I haven't had a chance to wear this out yet, but I suspect that it would last a long time. It was definitely more on the difficult side to remove but that is a quality I would need in a red lipstick.

In the photo below, I only have the lipstick applied with no lipliner underneath so I can show you how easy it was to control. It would probably look even better with a lipliner for maximum definition and wear-time.

Taken with flash
Photo of the product to show the shape of the tip
 Overall, I really love this lipstick and can't wait for the right night to wear it out. This is definitely a good quality lipstick and would purchase it again in the future. Have you tried this brand before? Are you brave enough to wear a red like this?

Tuesday, January 8, 2013

Maybelline Color Whisper Pin Up Peach Swatch and Review!

Hey readers! As an effort to get back into blogging, my goal is to update my blog every day. I have already came up with a list of things I want to blog about in the near future so we'll see how this goes :)

Today, I'm going to show you a lipstick called Pin Up Peach from the Color Whisper line by Maybelline. First of all, I thought the packaging was adorable. Each lipstick had a translucent bright color container and had a shiny silver label. It reminded me of Victoria's Secret for some reason!

I really loved the texture of this lipstick. It's very creamy, balmy and moisturizing. The color itself is buildable and decently pigmented as well. It also has a very nice scent to it. I would best describe it as a light peachy/fruity smell with maybe a hint of vanilla.

The color, Pin Up Peach is something that I thought would be most flattering to my skin tone and I would also be able to add a fun pop of color. I would describe it as a pinky peachy color with a slight hint of shimmer. I love it, I think it would look great on many skin tones.

Now, I'm going to show you an enlarged swatch on my lips, how the color looks in the container, and the packaging. The lipstick swatch was taken in daylight with flash. The picture of the product in the container was taken with no flash.
What do you think? Do you like the color? If anyone has photos of other colors they're tried, I would love to see them. I definitely plan on buying more :)

Monday, January 7, 2013

Happy Belated New Years Nails

Hello readers, it has been a very long time since I posted on here and I feel awful about it. I feel like I lost my mojo and inspiration a few months ago due to a lack of focus but I'm going to try and keep this up like I did in the past.

I know I'm about a week late but I really wanted to show off my New Years nails! I wanted to do something super blingy that standed out so I ended up doing a glittery metallic manicure.

I was originally just going to do silver (favorite metallic color) but I began to envy my sisters gold blingy nails that she did for new years and ended up with a mix of both manicures.

Before I get to the photos, I'm going to list what used and how I did it!

Cheers To You by China Glaze (metallic foil, 2 coats)
Techno by China Glaze (chunky silver holo glitter, 1 coat)
Northern Lights Hologram Topcoat (fine holo glitter topcoat, 1 coat)
Midnight Kiss by China Glaze (gold foil, sponged on tips)
Queen Of Drums by Dare To Wear (chunky gold glitter, sponged on halfway from tips)
Golden Enchantment by China Glaze (fine gold holo glitter topcoat, 1 coat)

I really love how Cheers to you and Midnight Kiss blended so perfectly together, These photos honestly don't do this mani justice and it is crazy how blingy they are in person. PS please ignore the fingernail imprint on my thumbnail... I have no idea how that got there =P

Indoors (With Flash)


Indoors (Indirect Sunlight)
Outdoors (Sun)
Outdoors (Shade)


Saturday, October 20, 2012

Bloody Halloween Nails

Hello readers. I have another Halloween themed post for you! I love doing my nails for Halloween and I decided to do one of my favorite scary manicures.

This is a repeat manicure of last years glow-in-the-dark blood spatter nails. I used a very messy and fun technique involving dipping one end of a straw into nail polish and blowing it onto my nails. Here is a link to the tutorial I go the idea from.

I used:
White- Alpine Snow by OPI
then two coats of Ghoulish Glow by China Glaze
Red- Drastic by China Glaze (near perfect jelly blood red)

One of my favorite parts of this manicure is that the white glows in the dark!

For now, I only have a pic prior to cleanup but I like it more that way =P


Monday, October 8, 2012

Vampire Look in Action!

Hello readers! A couple weeks ago, I posted a Halloween Vampire Look that I found off of someone's blog and I was finally able to have proper photographs taken by a good friend earlier this evening! I wanted to share the photos with you, as well as the photographers facebook page. MAJOR THANK YOU TO GROTHAUS PHOTOGRAPHY :D Check him out and like his page! I hope you enjoy the photos :)


Monday, September 24, 2012

Vampire Halloween Makeup

Hello readers, it's been so long since I've typed up a post on here. My hard drive crashed a couple months ago and I recently was able to recover my data and get back into the funk of things.

Today I wanted to show you something I haven't done before, which is a look for Halloween. The following look was inspired by this tutorial created by EMAN. I fell in love with the mysterious and edgy look and decided to recreate it with some of the makeup I had.

For the eyes, all the shadows I used were from my 120 eyeshadow palette which includes a full range of reds, purples, blacks, and whites, which are the colors needed to create the look. I purchased this specific palette from eBay and I like it because the colors are rich, pigmented, shimmery, and blend well. They last pretty long on their own but work even better with primer underneath. If you would like to see a review of the palette by Nihrida, click here! Her review is what convinced me to but the palette and overall I'm very happy with it.

I found very similar colors from the tutorial in the palette and followed EMAN's directions accordingly. Blending all the colors together was relatively easy to do. I found the hardest part of this look to be perfecting the point of the inner corners of the eyes since I have never tried a look like that before. After a few tries, I finally got it. I finished the eyes off with mascara. I used Rimmel's Lash Accelerator, which is AMAZING!

After the eyes were done, I cleaned everything up and added a new layer of foundation and blush. The foundation I use is Bare Minerals Matte in Golden Fair and the blush I use is Luminoso by Milani, which is a shimmery peachy blush.

Lips are last (as quoted by Carmindy from What Not To Wear) so I used Loreal Infallible Gloss in Rebel Red topped off with Rimmel's Smokey Finish lipstick from the Kate Moss collection. It's really fun to layer on top of red, hot pink, or magenta, especially in the evening. It adds a sheer, smoky, silvery, shimmery glitterness to it lol.

And noooooowwwww for the final look! I have an all-over face shot followed by some other shots so you can see the colors in different lighting... also a closeup of the lips which used to be a true, deep red along with the Smokey Finish on top. I hope you like it :)



Wednesday, July 4, 2012

Happy 4th of July! Independence Day Manicure :)

Hello readers. Today I'm going to show you my nails for 4th of July and show you last year's 4th of July nails.

I used:

Blue = Eyes Like Sapphires by China Glaze
Red = Ruby Pumps by China Glaze
Silver = Kiss Nail Art striper
White = Kiss Nail Art striper
Glitter topcoat = Northern Lights
Seche Vite topcoat

Here's how I did it:

I started off with two coats of Ruby Pumps. Then I did the white stripes by laying the brush pretty flat against the nail and dragging it. I then carefully drawed on the silver stripes where I wanted the blue to start. Then I freehanded two coats of Eyes Like Sapphires to the edge of the silver. I touched up the silver once more to even out the lines and finished it all with Northern Lights and Seche Vite :)


Like it? Post the links to your July 4th nails as well! I would love to see them! Click here to see others' July 4th designs.
Related Posts Plugin for WordPress, Blogger...